
This is a preview draft of the Flaanimal 6.0 Technical manual, posted so that owners and shops have advance notice on the technical details and features of their frameset while planning builds. It will be updated ongoing.
This will cover all of the uniquely developed features debuting exclusively on the new Flaanimal 6Ti
For any additional questions please email us at bikes@rodeo-labs.com
Sawtooth-2 Slider System:
The Sawtooth slider system was originally developed to maximize slider range, minimize slippage, and completely remove unsightly adjustment screws on an adventure frame. The Sawtooth-2 compared to our original iteration found on the TD4.0 addresses so much in one small package including: setup-ease issues, compatibility with transmission drivetrains, fits all brake calipers, uses the industry standard 160mm rotors natively, uses tool sizes commonly found in every home mechanic’s garage, changes the replaceable hanger into one found in all bike shops, and looks even cooler! Its design also minimizes the torque needed to keep a slider system in place by utilizing metal teeth that pair with corresponding toothed plates. A sliding dropout system allows a range of setups for your specific wheel and tires or preferred ride feel, as well as singlespeed chain tension adjustment. A longer wheelbase is more stable, while a shorter base is more nimble. A larger tire will need to be slid further back, while a road tire can be tucked in nice and tight.
Our slider system utilizes:
- Strong titanium sawtooth profiles CNC machined into the frame
- Four corresponding custom CNC’d Stainless Steel Sawtooth Compression Plates (2)
- Four M6x14mm Titanium Fixing Bolts (1)
- The aluminum sliding dropouts, non-driveside (brake mount, 4) and driveside (derailleur mount, 3)
- The rear thru-axle and accompanying Clever Lever axle tool
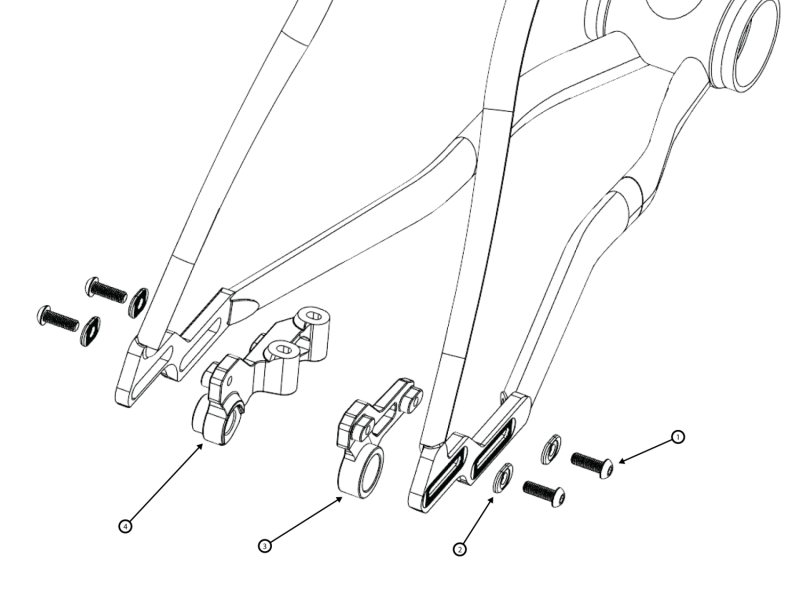
Our slider system is now SRAM T-Type Direct Mount native. You may install a SRAM UDH Hanger in the event you are running a non-T-Type derailleur, which is offered as a convenient add-on at checkout.
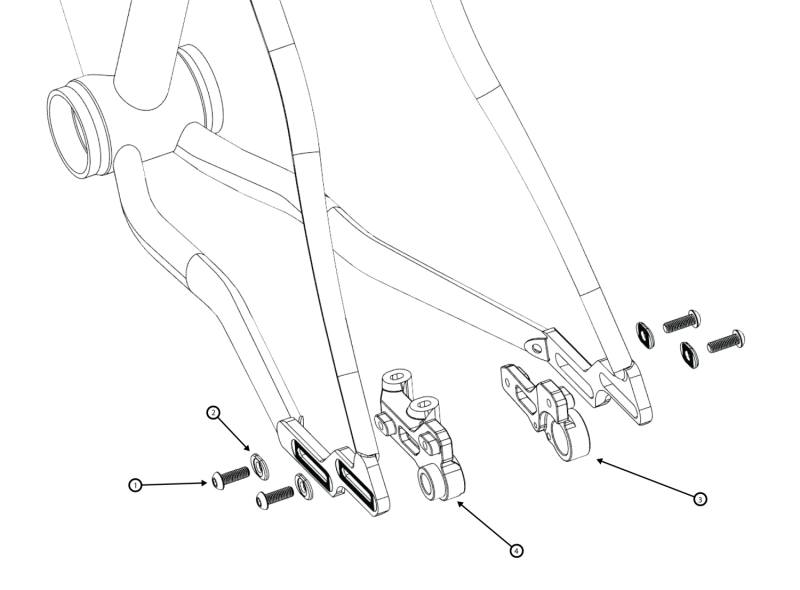
The easiest and most effective way to set up your sawtooth slider system is in this order:
- Place the non-driveside slider (4) into the frame slot from the inside.
- Tighten both bolts to your approximate needed rear wheel location by mocking up with the wheel.
- Set up the driveside slider (3) loosely, then thread in the rear axle.
- Make sure the driveside is loose enough to be pulled into alignment with the brakeside slider when tightening the axle.
- When the loose slider finds its corresponding parallel location to the tightened non-driveside, you can now tighten the driveside fixing bolts.
- Fine tuning this system in the event you find it is not perfectly aligned after this procedure involves simply moving one slider forward or backward in the appropriate direction to match the other slider side.
- When using a singlespeed setup, it is at this point you can cut the chain to the approximate size. If you have tucked the tire toward the frame, cut the chain on the long side and reposition the sliders equally backward on the sawteeth to achieve proper chain tension. If you have adequate forward tire clearance, you are free to cut the chain either too short or too long and adjust tension using the sawteeth in equal increments on each side. If you placed the sliders all the way back, cut the chain on the short side and then move the sliders forward until the chain can properly wrap on the cog.
The Keg T47 85.5mm Inboard Bottom Bracket
The T47 Inboard bottom bracket standard has been in our frameset ecosystem for many years now for its confident threaded installs, oversized durable bearings, and ample shell space for doing crazy Rodeo-type things inside of there. We have also settled on internal routing being the cleanest and longest lasting way to do things. Our previous metal bikes had housing pop out and be bolted onto the underside of the bottom bracket shell, compromising on housing and brake line damage potential at the bike’s lowest point, and also introducing the housing in a visually prominent manner. We made the custom Keg bottom bracket shell in a shape that appealed to our other passion for fermentation, which allowed the epic T47 Inboard standard to also accommodate and brake lines, shift housing, and Di2 wires you can throw inside it. Here are some pointers about what’s brewing down there:
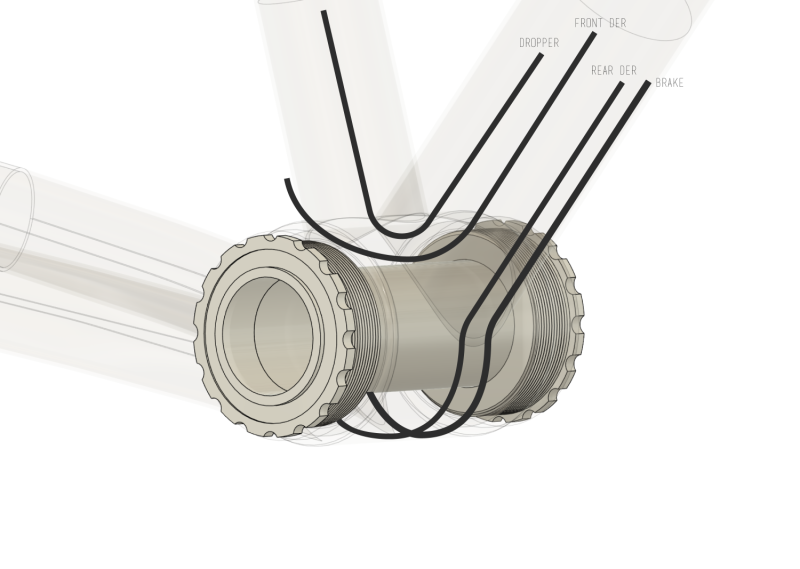
- The spindle protection sleeve that comes with your bottom bracket must be used with our bike (it should be anyway on any bike, just so you know). This ensures that your spinning crankshaft does not contact the lines and wires routed around it.
(White Industries Bottom Brackets require the addition of the spindle sleeve as a separate purchase, please ensure you add that to your cart if choosing this brand)
- The rear brake and rear shifting lines contour below the crank spindle sleeve, make sure you cut them after accounting for this room, and not at its taught length if at a straight shot through the shell.
- The front derailleur and dropper lines go above the crank spindle sleeve, and use the unique BowTie CNC cutout to ensure that transition is smooth as butter. The front derailleur will pop out of the hole located on the back of the seattube. The dropper will continue its way up to the post. This may be the best full internal routing in a metal bike on the market in terms of frictionless cable pull, as well as dropper post height adjustment or removal due to zero hangups throughout the tubing.
- Di2 battery location on this frame is constrained to the seatpost or seattube; fortunately, this happens to be ideal for routing wires and minimizing wire lengths. The front derailleur wire is very straightforward: simply pop out of the hole on the back of the seattube. The rear wire can be routed around the backside of the crank spindle sleeve, then into the driveside chainstay. We recommend then routing the rear wire around the outside of the rear dropout and securing it with the rear fender mount with a housing routing clip to minimize the chance of the chain or branches pulling on the flexible and floppy Di2 wire.
Global Headset Installation Note
Flaanimal 6 Titanium features an elegant hourglass shaped head tube. Because of this shape, a standard headset cup removal tool may not correctly function for removing the cups. An additional, easily available c-clip can be put in place along the rim of the inner edge of the headset cup to give the tool more purchase and make cup removal easy. We keep them in stock and offer them for $10. Just send a note if you need one.
https://www.mcmaster.com/98455A725/
Quite Integrated Headset (Optional Add-On):
When we saw that integrated routing was a thing, we just haaaaaaad to have it as an option. However, there were many drawbacks to the current integrated routing systems. They required a full set of compatible headset, stem, and bar, and were difficult to install. We went for one that you can use with any bar and stem (including suspension stems), and that uses regular stack spacers; it also allows more cable freedom due to retaining some external routing between the bars and frame, making swapping stems and bars, maintaining brakes and shifting, and dropping the fork much simpler operations than with full integration.
Here are some pointers on using an integrated headset system:
- It is absolutely imperative that you protect your brake and shifter lines from being worn through over time with housing dampener or protective tape. Similarly, if your lines are too taught, this also increases wear on the bending points where the lines are contacting the inside of the frame. While we have done everything we can when producing this frame to reduce premature wear such as smoothing out the transition walls between welded tubes and ensuring routing angles are not overly dramatic, it must not be taken for granted that these small hoses ensure your brakes’ function. DO NOT BE LAZY, INNATENTIVE, OR RUSH when building your bike semi or fully integrated, take the time to protect your brake and shifting lines properly the first time, and consequently your life.
- When routing, be sure the housing takes nice natural bends into the headset to ensure shifting quality and undamaged brake hose, and that they are not pulled extremely tight. The right setup will have the housing running cleanly and smoothly in line to the left and right of the stem and steerer.
- If your aim is the most friction free mechanical shifting performance, we recommend using the frame housing routing ports instead. Although we have ridden many derailleurs through this headset successfully, semi-integrated routing simply has tighter bends and more friction housing path can sometimes affect the shifting performance.
- We do not recommend using the headset upper to route a dropper post. Although possible, and we have tested it, it leaves inadequate room for the barrel adjuster (unless placed in the downtube), is more difficult to cut to the proper length, and presents a real maintenance and removal headache in the future that requires unclamping the dropper cable from the remote. We recommend simply using the frame port on the downtube for droppers for the best experience, or a wireless or lever dropper can be used.
- It is possible with a wide variety of stems to fully slam your steerer stack for maximum speed mode, an intentional design feature. However, we haven’t tested every stem in the world, so there may exist some bulky blocky stems out there that will partially block the headset holes if slammed all the way down, which will pinch your lines and cause a potential braking safety issue. Do not damage your brake lines with your stem, crashing and being injured for the year is much slower than being 10mm more aero!
- This headset cannot be paired with other integrated routing systems, such as Ritchey or FSA. If you are using fully integrated housing on your build you must pick one brand of housing integration system to use on your bike, and you must also purchase and use the headset designed for use with that system separately. For example the FSA integrated bar / stem / routing system must use the FSA integrated system headset.
Spork 3.3:
FL6Ti is paired with an even-more-holey Spork variant that allows integrated front brake routing that runs through a hole at the base of the steer tube then into the fork leg through the fork crown. This hides the front brake line completely from view. It also features 3 bottle bolt bosses on each leg, rather than our traditional choice of 2: yes center-of-gravity, you finally win the debate! The fork is otherwise identical to the Spork 3.2 and retains its approximate 500g feathery weight uncommonly found on MTB ISO Tested carbon adventure forks. We also retained the exterior leg routing hole if you want to keep things simple and traditional when routing the brake, but also included the steerer routing hole if your aim is clean looks.
This added routing hole produced another hidden benefit. It is possible to squeeze a rear dynamo light wire through it alongside the brake hose to achieve a fully-integrated, human-powered lighting system. It is a tight fit, but we’ve done it successfully! Pair it with our custom rear dropout light mount and you’re looking sharp as a marble.
On the smaller half of the frame sizes, 54cm, 52cm and 49cm, the offset of the Spork has been changed to 50mm, as opposed to the standard 45mm. This helps retain more similarities in ride feel on these bike sizes, and addresses toe overlap issues with large front tires.
Integrated Dynamo Routing:
Our frames have featured a similar level of excellent lighting wiring for some time now, but it was perhaps under-explained and underutilized due to a missed opportunity in the owner’s manual of proactively displaying these versatile features. On Flaanimal 6, we made sure your curiosity about safety and riding at more hours of the day (or night) was made easily attainable. The three lighting wire exit holes are located: under the toptube, behind the seatpost collar on the non-driveside seatstay, and near the non-driveside dropout. Our toptube to seat stay transition is actually 3D printed, allowing us to give you all the room you need to feed a rear light wire through the frame hassle free. The wire exit ports are conveniently located near mounting points to securely bolt on your light, and not rely on rubber bands that will inevitably wear and snap. The toptube wire exit point is located where many frame or toptube bags commonly feature wire exits, so you can run a portable battery wire to power your lights if you don’t opt for a dynamo hub. Conversely, if you do opt for a dynamo hub with the appropriate clever wiring, the toptube exit port can be used to charge your phone, Garmin, Wahoo, spare AXS battery, etc. If you need inspiration or guidance on the endless possibilities of wiring up our frames, please email us.